
Project Background
Definition:
Before diving into making tessellations, let's ask: What is a tessellation?
A tessellation is the tiling of a plane using one or more geometric shapes such that there are no overlaps or gaps. In other words, a tessellation is a never-ending pattern on a flat 2-D surface (such as a piece of paper) where all of the shapes fit together perfectly like puzzle pieces, and the pattern can go on forever.
Examples of Tessellations:

Not Examples of Tessellations:


Now that we know what a tessellation is, how do we make one?
We have four different ways to create your own tessellations!
Getting Started: Beginner Tessellation
 No cutting is involved for this starter tessellation design, making it a great starting project for younger artists.
STEPS:
1. Start with a piece of paper and a pencil. We recommend starting with half of a regular 8.5" x 11" white sheet of paper.
2. Divide the paper up into equal width rows (or columns); about 3-4 rows for a small sheet will work very well.
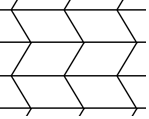
3. In one row, draw a simple shape that spans the entire height of the row (see image above), such as a square, triangle, a lopsided rectangle (parallelogram), or other shape of your choice. Draw that shape again immediately next to your first shape. Do they fit together perfectly? What if you draw a third shape immediately next to the second shape? Do they still fit together perfectly?
4. If your shapes are fitting together perfectly, keep drawing them in each row until your entire sheet is filled up.
5. Color in your tessellation and display!
Step it up: Ready for a harder challenge? Skip Step 2 and just try drawing a shape on a piece of paper. Now try drawing that shape again immediately next to the first shape. Do they fit together? Try creating more complex shapes, like fish, flowers, or even dinosaurs!
1-Step Cutting Tessellation
 Great for beginner cutters, and a great next step into more complex tessellation making.
STEPS:
0. Start with five squares of paper that are the same size.
1. Take one square piece of paper and cut a weird shape out of one side of the square. (So if you start cutting from the bottom side of the square, make sure your scissors finish cutting on the bottom side of the square!)
2. Line your oddly-shaped cut-out on top of a second square of paper, lining up the long edges. Trace your cut-out onto the square with your pencil.
3. Repeat for each of the remaining three squares. Ensure that your oddly-shaped cut-out is facing the same way every time you trace it.
You should now have four squares of paper, each with your shape traced out in the same way.
4. Take one of your squares and cut out your tracing.
5. Rotate the square by 90˚(one corner in either direction) so that you have a fresh, flat, un-cut edge of the square facing you. Tape your cut-out shape to that side of the square, lining up the long flat edges.
6. Repeat Step 4 and Step 5 for each of your remaining squares. Very important -be sure to maintain the same orientation of your cut-out shape every time you tape it!
7. Fit all of your new tessellation pieces together to create a beautiful, puzzle-like work of art!
2-Step Cutting Tessellation
 These tessellations are nearly identical to the ones just explained, but have an extra step that allow for even more creative designs!
STEPS:
1. Take a small square piece of paper (about 4"x4") and cut a weird shape out of one side of the square, just as before.
2. Tape your cut-out shape to the opposite side of the square, maintaining its orientation and lining up the long flat edges.
3. Pick one of the two remaining untouched sides of the square and cut another odd shape out of that side.
4. Repeat Step 2: Tape your new odd shape to the opposite side, maintaining orientation and lining up the long edges. You should now have a unique shape that no longer has any flat long sides.
5. Trace your tessellation shape onto a piece of paper over and over again, fitting the shapes together.
6. Use crayons, markers, glitter, or any extras you wish to make your tessellation art extra incredible!
"PART" to "TRAP" Tessellation

Ready for a more complex challenge in creating amazing tessellations? The "PART" to "TRAP method is a great way to create a unique shape that you can trace over and over again on paper for an intricate tessellation design!
STEPS:
1. Take a square piece of paper and write the letters 'P', 'A', 'R', and 'T' in each corner.
2. Take a pencil and draw a funky line horizontally across the paper, separating the 'P' 'A' side from the 'R' 'T' side.
3. Draw another funky line vertically down the paper, separating the two sections into a total of four sections.
4. Cut along your lines, yielding four separate shapes, each with a single letter.
5. Re-arrange the shapes such that the letters meet in the middle and they spell the word "TRAP".
6. Tape the four pieces together to create a single tile.
7. Trace your tessellation creation onto a sheet of paper. Once your shape is traced, slide your tessellation to the immediate left, right, top, or bottom of your tracing, and trace again. Repeat until the entire sheet is filled up with your amazing tessellation creation!