
Setting up your hi-hat stand is easy if you know how the features work and what could go wrong. What I thought was a straight-forward task as a first time drum set owner turned out to be more involved than I had initially thought.
When I was in fifth grade, my cousin gave me a drum set. My father picked it up on his way home from work, and I was so excited to finally have a full drum set. It was a Slingerland from the ’60s or ’70s, and I still use it today.
My Biggest Mistakes
My cousin told me that he would come over and help me set it up, but I assured him that I had it under control. He stopped by anyway, and it was a good thing because I set up the hi-hat all wrong.
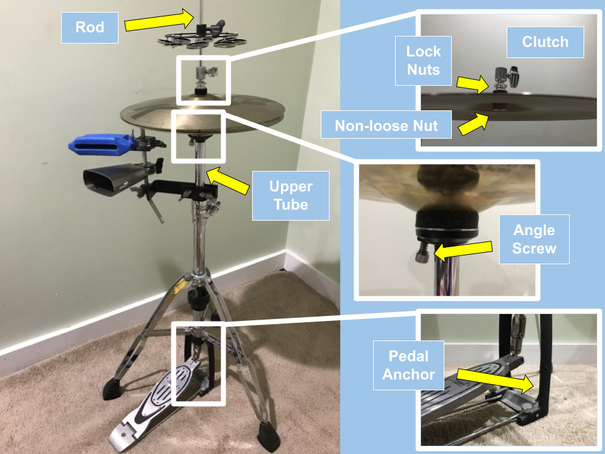
Starting with the clutch, I had the lock nuts and non-loosen nut in the wrong place. Each lock lock nut was on either side of the cymbal, and I put the non-loosen nut on last because I didn’t know what to do with it. This was the first thing my cousin fixed for me.
The rod was bent in transit, and I will never forget how frustrating it was to play with a hi-hat stand that occasionally got stuck. I’ll share how I avoid this issue in the do’s and don’ts listed below.
Although it wasn’t my fault, the pedal anchor — that piece that keeps the pedal from moving around — was broken. Actually, it was missing because it broke off. I fixed that issue by connecting a piece of wire to the pedal where the hinge is attached and connected it to the foot of my throne.
Summary of the Setup Steps
| To Do | Adjustment | |
| 1 | Loosen the T-bolt and fold out the legs. | Set the legs so that the pedal anchor isn’t touching the floor or too high off the floor, either. |
| 2 | Screw in the rod. | Add the clutch and tighten it to the rod for added leverage when tightening. |
| 3 | Check the bottom cymbal washer and felt. | The washer goes on first, followed by the felt. |
| 4 | Slide the bottom cymbal onto the seat. | Most pairs of hi-hats include a thicker / heavier bottom cymbal. |
| 5 | Attach the top cymbal to the clutch. | The two lock nuts should be installed so the flanges are away from each other. The non-loose nut goes on after the cymbal and second small felt. |
| 6 | Slide the clutch (with cymbal) onto the rod. | Tighten the T-bolt when the cymbals reach the desired distance apart from one another. |
| 7 | Adjust the upper tube to find the right height for you. | Keeping the clutch T-bolt loose will help you fine tune the adjustment. Push the pedal down or up and set the T-bolt. |
| 8 | Move the stand to a comfortable orientation with your snare and other instruments. | If you legs swivel on the lower stand tube, you can move them to make situating your snare stand easier, for example. |
Parts of a Hi-Hat Stand
Do’s and Don’ts
The “do’s and don’ts” are a combination of ways to avoid malfunctions and get good sounds from the hi-hat cymbals.
1. Adjust the Legs
DO make sure the pedal anchor is not on the ground and supporting too much weight.
When the pedal anchor touches the ground too much, the stand becomes unstable and wobbles in different directions. This adjustment of the legs needs to be precise because you want the spurs to dig into the rug a little without the anchor taking on too much of the weight and downward pressure.
DON’T set the legs so the pedal anchor is too high off the floor.
On the other hand, if you overcompensate and the pedal anchor is too high off the floor, the downward pressure as you push down the pedal will add horizontal movement. This movement would put a strain on the pedal anchor and other parts over time that could lead to malfunction.

2. Use the Spurs
DO set the spurs to grip the carpet and support the pedal.
Once the height of the anchor is set, the spurs can be adjusted to stick into the floor more or less. This feature is a fine tuning that leads to a lot of stability.
DON’T let the spurs ruin a wooden floor.
The spurs are sharp and will destroy a floor. They are designed to grip a carpet or rug, which is what you want to keep all of your hardware in one place.
3. Be Gentle With the Rod
DO protect it from being bent, especially during transport.
I take unscrew the rod and slide out the upper tube to protect both the rod and bottom hi-hat cymbal seat from being damaged. Leave the clutch at the top of the rod, and most of the rod will be protected by the tube. This part of the stand fits in my stick bag, which is where it lives when I’m not using it.
DON’T strip or cross the threads that connect the top section of the rod to the internal mechanism.
Be careful not to cross thread it into the nut that receives the rod. These threads are small and need to be in good condition for the stand to work in the long run.
4. Find the Cymbals You Want
DO place the bottom hi-hat cymbal on first.
This seems obvious, right? But the point is simply that cymbal makers most often design the bottom hi-hat to be a little thicker than the top. Some models are matched, and some players buy two tops or two bottoms. I use a top Zildjian K with a bottom A Custom.
DON’T limit yourself to just hi-hat cymbals.
Any cymbals could be used. A lot of drummers are experimenting with crash cymbals, stacks, and non-cymbal items, like Terry Bozzio’s roto tom pieces. For my remot hat, I use an 11” Zildjian K Custom Hybrid Splash on top and a 12” Wuhan china for the bottom.
5. Tighten the Clutch Nuts
DO experiment with how much the top hi-hat cymbal moves.
The movement of the cymbals can add to the sound you may be looking for. I like a little movement, while some players like a lot.
DON’T leave the lock nuts unlocked.
If the nuts (the two above the top cymbal) are left unlocked, the movement of the cymbal can increase and eventually loosen the non-loose nut. It happens to almost everybody at one point or another. When it does, you lose control over raising the top cymbal from the bottom
6. Set the Upper Height Adjustment Tube
DO use the memory lock system to maintain consistency.
Once the height adjustment is made, use the memory lock to ensure consistency every time you set up the hi-hat stand. If your stand doesn’t have a memory lock, hose clamps work, too. But I recommend investing in a good stand that has a memory lock.
DON’T set the hi-hat so low that you can’t access the playing surfaces well.
You want to be able to play the hi-hat with the tip of the stick on the top of the cymbal as well as the edge of the cymbals with the shoulder of the stick.
For more information on hi-hat techniques, check out this article with 8 techniques for getting good sounds.
7. Use the Angle Screw
DO angle the bottom cymbal to get a better “chick” sound.
The foot chick sound that’s made when you bring the cymbals together quickly is one of the most important functions of the hi-hat stand. If the air gets pushed out quickly and evenly around the cymbals, the can cancel out some of the sound and create a suction. Angle the bottom cymbal to avoid this situation.
DON’T forget to put the washer under the felt so it contacts the angle screw.
Sometimes we lose parts we didn’t know were important. The hi-hat stand will work without the seat washer, but the angle screw adjustment works most efficiently with the washer in place.
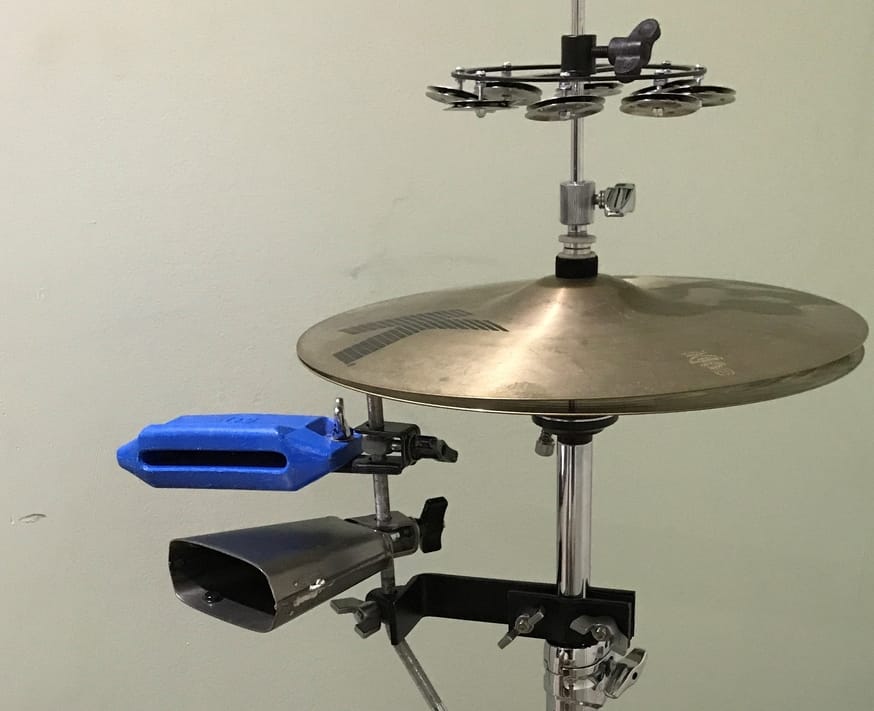
8. Add Percussion to the Setup
DO select sounds that will expand your palate.
Adding a tambourine or ching ring (jungles that sit on the top cymbal) is a safe place to start because it’s a sound that so many songs use. Think beyond the safe place and think about adding a cow bell or tone block to the side of your stand. Or, how about dropping some goat nails on the top cymbal to dirty
DON’T use instruments that will destroy your stand.
Some tambourines, for example, are designed to clamp to the rod. For the designs that clamp in the center, there is no problem. The tambourines with clamps on the edge can bend the rod, especially if you strike the tambourine while it’s clamped on the rod.
9. Clamp on a Snare
DO make sure your stand can handle the snare load.
Choose a snare that isn’t too heavy. If your stand is a light weight design, you should probably put the snare on a snare stand. Some snares are designed to clamp on a stand, and some stands are heavy duty enough to manage the stress.
DON’T buy cheap clamps that will potentially damage your hi-hat stand.
This is one of the least likely issues because most clamps are designed to grip without crimping the tube of the cymbal stand. The problem usually comes from clamps that wander because they are hard to tighten. People will use pliers or a wrench to tighten the wing nuts on the clamp and the extra leverage, combined with a poor clamp design, may crimp the tube.
Final Thoughts
Hi-hat stands are one of the most important pieces of hardware for your drum set. If it’s not set up properly, your potential will be inhibited by a stand that takes away from the sound, moves in awkward ways or falls apart while playing it.